
How to Layout Stair Stringers
Learn how to plan the measurements and layout of a straight stair stringer. This guide explains total rise, tread depth, riser count, and the basic marking process using a framing square.
The method focuses on conventional straight stairs with notched stringers. Other stair configurations and structural systems may require different methods.
What Is a Stair Stringer?
A stair stringer is a structural member that supports the stair treads and transfers their loads to the supporting structure.
A common notched stringer uses a series of horizontal and vertical cuts to support the treads and risers.
Before marking a stringer, determine the complete stair geometry, including finished floor elevations and available horizontal space.
1. Measure the Total Rise
Total rise is the vertical distance between the finished lower and upper walking surfaces.
Measure from the finished lower floor or landing to the finished upper floor or landing.
If floor finishes have not been installed, account for their final thicknesses.
For example:
Total Rise = 105 inches
This is the vertical distance the staircase must cover.
Avoid measuring only between unfinished framing surfaces if the finished floor levels will be different.
2. Calculate the Number of Risers
A riser is the vertical distance between adjacent walking surfaces.
To estimate the number of risers:
Estimated Risers = Total Rise / Preferred Riser Height
The number of risers must be a whole number.
For an example with a total rise of 105 inches and a preferred riser height of 7 inches:
105 / 7 = 15 Risers
The resulting actual riser height is:
Actual Riser Height = Total Rise / Number of Risers
105 / 15 = 7 inches
All risers should be planned to have the same finished height.
The selected dimensions must also be checked against applicable building requirements.
3. Determine the Number of Treads
For a conventional straight flight terminating at an upper floor or landing, the number of separate treads is usually one fewer than the number of risers.
Number of Treads = Number of Risers − 1
For our example:
15 − 1 = 14 Treads
The upper landing acts as the final walking surface.
The relationship may differ for other stair configurations or special upper connections.
4. Choose the Tread Depth
Tread depth, also called going in some contexts, is the horizontal distance between the leading edges of successive walking surfaces.
For this example, use a tread depth of 10 inches.
Total Run = Number of Treads × Tread Depth
14 × 10 = 140 inches
The staircase therefore requires 140 inches (11 feet 8 inches) of calculated horizontal run.
This does not include any additional space required for upper or lower landings.
The physical width of a tread board and its nosing projection are separate considerations.
5. Review the Stair Dimensions
Before laying out the stringer, review the completed geometry.
| Measurement | Value |
|---|---|
| Total Rise | 105 in |
| Risers | 15 |
| Riser Height | 7 in |
| Treads | 14 |
| Tread Depth | 10 in |
| Total Run | 140 in |
| Stair Angle | 34.99° |
Use the Stair Calculator to calculate these measurements before marking the lumber.
Reference Building Requirements
The 2021 International Residential Code (IRC), Section R311.7.5, contains the following dimensional provisions for stairs within its scope:
| Measurement | Reference |
|---|---|
| Maximum riser height | 7¾ in |
| Minimum tread depth | 10 in |
| Maximum riser height variation within a flight | ⅜ in |
| Maximum tread depth variation within a flight | ⅜ in |
For typical 10-inch treads, also check nosing requirements. IRC 2021 generally addresses nosing projection from ¾ to 1¼ inches and includes an exception when tread depth is at least 11 inches.
Additional requirements apply to nosings, landings, width, headroom, handrails, guards, and structural components.
The 2021 IRC is cited as a dated reference, not as a claim that it is the currently adopted code in every jurisdiction.
Verify your locally adopted code and amendments before building.
6. Prepare the Stringer Layout
For a conventional notched stringer, commonly used layout equipment includes:
- Framing square
- Stair gauges or a securely attached straightedge
- Measuring tape
- Pencil
- Straightedge or level
- Suitable lumber selected for the structural design
Do not select stringer material or spacing solely from the stair geometry. Stringer dimensions, grade, support conditions, and load requirements need separate verification.
Inspect the stock for defects that could affect the layout or structural capacity.
7. Mark the Rise and Run
Set the framing square to the calculated unit rise and unit run.
For this example:
Unit Rise = 7 inches
Unit Run = 10 inches
Position the square on the stringer stock and mark the first horizontal tread line and vertical riser line.
Move the square along the board so the next layout begins at the previous step intersection.
Repeat the same rise and run measurements for the required stair layout.
Check each mark as you go. Small marking errors can accumulate across the flight.
Clearly identify the parts of the board that would be removed when cutting.
8. Account for Tread Thickness and Finished Floors
The thickness of the finished treads affects the final height of the first step.
In a conventional notched-stringer arrangement supported on a finished lower landing, the bottom stringer cut is commonly adjusted by the finished tread thickness to maintain equal finished riser heights.
For example, with a ¾-inch tread on every stringer notch, that conventional arrangement may require reducing the bottom layout height by ¾ inch.
However, the exact adjustment depends on the upper attachment, lower support, finished floor elevations, tread thickness, and construction details.
Do not apply a fixed subtraction without checking the complete assembly.
The goal is for every completed riser, including the first and last, to have the intended finished height.
9. Check the Top and Bottom Connections
The stringer must have properly designed support at both ends.
At the top, verify how the stringer connects to the upper framing or landing.
At the bottom, verify that the supporting surface and connection arrangement are suitable for the loads.
Check that the finished treads will be level and the risers will remain uniform after installation.
A correct geometric layout does not establish the strength of the stringer or its connections.
10. Verify the Layout Before Cutting
Before making permanent cuts, review the complete layout.
Check that:
- The number of risers and treads is correct.
- Unit rise and unit run are consistent.
- Finished floor heights have been included.
- Tread thickness has been accounted for.
- The upper and lower connections match the intended design.
- Enough sound wood remains after notching.
- The planned stringer dimensions and spacing satisfy structural requirements.
Avoid extending saw cuts beyond the corners of the planned notches. Overcuts can weaken the stringer.
Where a layout requires notches, inside corners should be completed without unnecessary overcutting.
Before repeating a stringer pattern, verify the first layout against the actual site dimensions.
Common Stair Stringer Layout Mistakes
Using an Incorrect Total Rise
Measuring unfinished floor elevations without accounting for finishes can produce uneven first or last risers.
Counting Too Many Treads
For a conventional straight flight ending at an upper landing, the tread count is typically one less than the riser count.
Ignoring Tread Thickness
Failing to account for finished tread thickness can make the bottom riser different from the others.
Confusing Going With Board Width
Tread depth is defined by the horizontal distance between successive leading edges, not simply by the width of a tread board.
Overcutting the Stringer
Cutting beyond the marked inside corners removes additional material and can weaken the stringer.
Assuming Correct Geometry Means a Safe Staircase
Stair safety also depends on structural design, connections, landings, headroom, guards, handrails, and applicable codes.
Frequently Asked Questions
How do I calculate stair stringer rise and run?
Measure the total rise, divide it into a whole number of equal risers, and select a suitable tread depth. Multiply the tread depth by the number of separate treads to obtain the total run.
How many treads are needed for 15 risers?
For a conventional straight flight where the upper landing serves as the final walking surface, 15 risers normally correspond to 14 treads.
Why is the bottom of a stair stringer adjusted?
The adjustment accounts for the installed tread and floor geometry so the first finished riser matches the others.
Can I use a 2×12 for stair stringers?
A 2×12 is commonly used for conventional notched stringers, but it is not automatically adequate for every staircase. Suitability depends on span, loading, grade, remaining material after notching, spacing, and support conditions.
How many stringers does a staircase need?
There is no universal number. The required quantity and spacing depend on stair width, tread material, structural design, and applicable requirements.
Does the Stair Calculator provide cutting dimensions?
The calculator provides stair geometry, not a complete stringer cutting plan. Final marking and cutting dimensions depend on material thickness, finished elevations, and connection details.
Official and Technical References
International Residential Code — 2021 Edition
International Code Council. Relevant sections include R311.7.5 (Treads and Risers) and associated stair requirements.
Laying Out Basic Stair Stringers
Fine Homebuilding. Practical reference for using a framing square and checking stringer layout.
Related Calculator
Stair Calculator
Calculate rise, run, riser count, tread depth, and stair angle before preparing your layout.
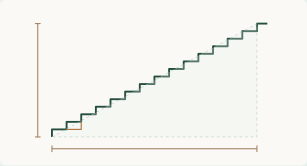
Stair stringer geometry
CUTTING & LAYOUT REFERENCE
Total Rise 105 in ↑ 15 equal risers (7 in) · 14 treads × 10 in → Total Run 140 in